HP LaserJet Pro Printers - Blinking Lights - HP laserjet p1102
HP LaserJet Pro Printers - Blinking Lights - HP laserjet p1102
This document is for the LaserJet Pro M12a, M12w, P1102, P1102s,
P1102w, P1106, P1108, P1109, and P1109w printers.
The lights on the control panel indicate the printer status. These lights
can be on, off, or blinking, depending on the status of the printer. The
lights can all blink in distinct patterns to indicate the printer status
or potential error conditions.
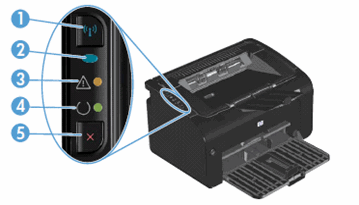
Figure : HP LaserJet Pro M12a, P1102, P1102s, P1106, P1108, and
P1109 printers

-
Attention light
-
Ready light
Figure : HP LaserJet Pro M12w, P1102w, and P1109w
printers
-
Wireless button
-
Wireless light
-
Attention light
-
Ready light
-
Cancel button
The Wireless light blinks
The Wireless light  blinks when a connection is configuring or when the printer cannot find
a wireless signal or cannot connect to the network.
blinks when a connection is configuring or when the printer cannot find
a wireless signal or cannot connect to the network.
blinks when a connection is configuring or when the printer cannot find
a wireless signal or cannot connect to the network.
Step 1: Wait for the printer to establish a connection
The Wireless light blinks when the printer is attempting to connect to
the wireless router or access point. Wait a few minutes, and then
check the light again.
-
If the Wireless light is on and steady, the printer is connected and you can stop troubleshooting.
-
If the Wireless light is still blinking, continue to the next step.
Step 2: Check for issues with the wireless network
The following factors can cause the printer to lose the wireless
connection:
-
The network connection is no longer active, or has low signal strength.
-
The printer goes into sleep mode or standby mode.
-
The printer is either too far away from the wireless router, or too close to it. The recommended distance between the printer and the router is 1.0 meter to 1.5 meters (3 ft to 5 ft).
-
A firewall prevents the printer from accessing the computer and wireless network.
-
A nearby device that emits radio signals (such as a microwave or cordless telephone) might interfere with the wireless connection.
-
A virtual private network (VPN) prevents the printer from accessing the computer and wireless network.
Check the Wireless light after correcting any items on the list.
-
If the Wireless light is on and steady, the printer is connected and you can stop troubleshooting.
-
If the Wireless light is still blinking, continue to the next step.
Step 3: Connect the printer to your network
For more information about connecting the printer to the wireless
network by installing the printer software, see the following
documents.
-
HP LaserJet Pro P1102w and P1109w printers: Go to Wireless Printer Setup.
-
HP LaserJet Pro M12w printers: Go to Wireless Printer Setup (Windows).
-
HP LaserJet Pro M12w printers: Go to Wireless Printer Setup (OS X).
The Attention light blinks
The Attention light  blinks when the printer is in an error state due to missing toner
cartridge, the top cover is not properly closed, or the paper is not
loaded correctly or is jammed.
blinks when the printer is in an error state due to missing toner
cartridge, the top cover is not properly closed, or the paper is not
loaded correctly or is jammed.
blinks when the printer is in an error state due to missing toner
cartridge, the top cover is not properly closed, or the paper is not
loaded correctly or is jammed.
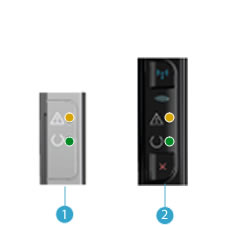
Figure : Example of the Attention light blinking

-
Control panel HP LaserJet Pro M12a, P1102, P1102s, P1106, P1108, and P1109 printers
-
Control panel HP LaserJet Pro M12w, P1102w, and P1109w printers
The Attention light blinks, and the toner cartridge might be missing
This condition occurs when the toner cartridge is absent or not
installed correctly. To resolve the issue, reinstall the toner
cartridge.
Step 1: Examine the toner cartridge area
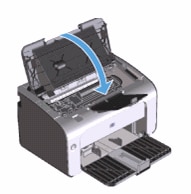
Open the top cover, and then check the toner cartridge.
Figure : Opening the top cover

-
If the toner cartridge is missing, install the missing toner cartridge.
-
If the toner cartridge is in the printer, it might not be installed correctly. Remove the toner cartridge, and then reinstall it.For more information about removing, and then reinstalling the toner cartridge, go to Replacing the Toner Cartridge.
Step 2: Service the Printer
If you have completed all the previous steps and the issue
persists, continue to the Service the printer section at the end of this document.
The Attention light blinks, and the top cover might not be closed
This condition occurs when the top cover is open or not closed
completely. To resolve the error, make sure the cover is closed
completely.
Figure : Closing the toner cartridge door
The Attention light blinks, and the paper might be missing or not properly loaded
This condition occurs if the priority feed slot or input tray is
empty. To resolve the issue, load plain paper into the priority feed
slot or the main input tray.
Load paper in the priority input tray (HP LaserJet Pro P1102w and P1109w printers)
Load plain paper print side facing up into the priority input
tray. For more information about loading paper, go to Loading
Paper, Envelopes.
Load paper into the input tray
Load plain paper print side facing up into the input tray. For
more information about loading paper, go to Loading Paper,
Envelopes.
The Attention light blinks, and the paper might be jammed
This condition occurs when paper is jammed inside the printer. To
resolve the error, find and clear the printer of any jammed paper, or
reset the printer if the printer has no jammed paper. For more
information about resolving paper jam issues, go to Clearing a
Paper Jam to remove jammed paper from the printer.
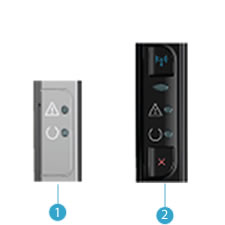
The Attention and Ready lights are on
This condition occurs when the printer is in a fatal error state.
Figure : Example of the Attention and Ready light on
-
Control panel HP LaserJet Pro M12a, P1102, P1102s, P1106, P1108, and P1109 printers
-
Control panel HP LaserJet Pro M12w, P1102w, and P1109w printers
Step 1: Reset the printer
Reset the printer to clear the printer error.
-
With the printer turned on, disconnect the power cord from the printer.
-
Unplug the power cord from the power source.
-
Wait 60 seconds.
-
Reconnect the power cord to a wall outlet and to the printer.
NOTE:
HP recommends plugging the printer directly into a wall outlet.
Try to print. If the issue persists, continue to the next step.
Step 2: Plug the printer directly into an electrical outlet
Plug the printer directly into an electrical outlet to make sure the
power source functions correctly.
-
Unplug the power cord from any surge protector, extension cable, or power strip.
-
Plug the power cord directly into a wall outlet.
-
Turn on the printer.
Try to print. If the issue persists, continue to the next step.
Step 3: Service the printer
If you have completed all the previous steps and the issue persists,
continue to the Service the printer section
at the end of this document.
All lights are off, and the printer does not respond
This condition occurs when the printer is turned off or there is an issue
with the power supply.
Figure : All lights off, printer not responding
-
Control panel HP LaserJet Pro M12a, P1102, P1102s, P1106, P1108, and P1109 printers
-
Control panel HP LaserJet Pro M12w, P1102w, and P1109w printers
Step 1: Turn on the printer
Press the Power button to turn on the printer.
Figure : Pressing the Power button

If the printer does not turn on, continue to the next step.
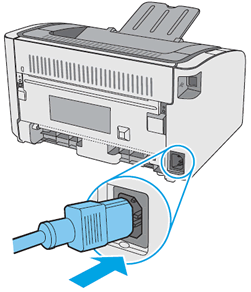
Step 2: Make sure the printer is plugged in
Make sure the power cord is connected to the rear of the printer and
plugged into an electrical outlet.
Figure : Plugging in the power cord
Step 3: Plug the printer directly into a wall outlet
If you are using a surge protector, extension cable, or power strip,
plug the printer directly into a wall outlet to make sure the power
source functions correctly.
-
Unplug the power cord from any surge protector, extension cable, or power strip.
-
Plug the power cord directly into a wall outlet.
-
Turn on the printer.
If the printer does not turn on, continue to the next step.
Step 4: Make sure the electrical outlet works
Make sure the electrical outlet the printer is plugged into is
providing power.
-
Unplug the power cord from the electrical outlet.
-
Plug another appliance into the electrical outlet to make sure the outlet works.
-
If the electrical outlet does not work, plug the printer into another outlet that does work.
-
If the electrical outlet works, but the printer still does not turn on, continue to the next step.
Step 5: Test the power with a compatible power cord from a different printer
If you have another available power cord that is compatible with your
printer, use the alternate cord to repeat the steps to test the power.
-
If the printer does not turn on with the alternate power cord, continue to the next step to service the printer.
-
If the printer turns on with the alternate power cord, the original power cord caused the issue. Contact HP to replace the power cord.
Step 6: Service the printer
If you have completed all the previous steps and the issue persists,
continue to the Service the printer section
at the end of this document.
https://support.hp.com/

Comments
Post a Comment